I recently had the opportunity to build two custom shiny inputs. In the past I’ve made a feeble effort to do this, but for this project failure was not an option. I used a handful of excellent examples to build my inputs, so I’ll list them now and then describe what I found to be difficult or unclear about the process.
Start with the description from the horse’s mouth:
https://shiny.rstudio.com/articles/building-inputs.html
This link describes how to create your custom input binding outside of a package, which may be useful.
A live example in a shiny app:
https://shiny.rstudio.com/gallery/custom-input-bindings.html
A different example and walk-through:
https://shiny.rstudio.com/articles/js-custom-input.html
Then look at this illuminating question at SE:
https://stackoverflow.com/questions/36899225/shiny-custom-input-binding-for-limitslider
The third link above does a pretty good job at walking through each element, but I might repeat it all and see if I can describe why at first I found this to be a challenge.
There are three parts to a custom input:
- First is the HTML and CSS, which is probably fairly straightforward if you are building a shiny app.
- Second is some initial javascript to run the custom input; hopefully this is also straighforward, because basic knowledge of javascript and jQuery (and the difference between the two) is important.
- Third is transferring the input value to the shiny server, or vice-versa. This is the challenging part.
I felt that the third step is challenging because the documentation (the first link above) describes what methods your input needs, but not what each method does. The third link does a better job, but it doesn’t really help if you are doing this for the first time and step 3 isn’t working. The fourth link holds the key to sucess, and I’ll try to describe why.
If you write R packages with the S4 method dispatch, you know what I mean when I say that a shiny input binding is kind of like creating a special js class and a few methods for that class (even though technically it is just a binding, which is a function within a defined scope). The shiny package will repeatedly and automatically call the methods that you write, and these methods work together to trasfer input values from the client-side to the server-side of your app.
Here is the sample input from link 1, above:
var incrementBinding = new Shiny.InputBinding();
$.extend(incrementBinding, {
  find: function(scope) {
    return $(scope).find(".increment");
  },
  getValue: function(el) {
    return parseInt($(el).text());
  },
  setValue: function(el, value) {
    $(el).text(value);
  },
  subscribe: function(el, callback) {
    $(el).on("change.incrementBinding", function(e) {
      callback();
    });
  },
  unsubscribe: function(el) {
    $(el).off(".incrementBinding");
  }
});

Shiny.inputBindings.register(incrementBinding);
The new “class” (really a binding) registered here is the incrementBinding, the the minimal methods that shiny will call are find, getValue, setValue (with receiveMessage), subscribe, and unsubscribe.
find:- used by shiny to locate your input in the DOM during its timed scan.
getValue:- import a value to R from js.
- argument “el” is the return value from
find.
setValue:- send a value from R to js via
receiveMessage. - argument “el” is the return value from
find. - argument “value” is a value to set, as JSON or any type.
- send a value from R to js via
subscribe:- listen for changes to the input value.
- argument “el” is the return value from
find. - argument “callback” is the function that shiny will execute when called.
unsubscribe:- stop listening for changes to the input value.
- argument “el” is the return value from
find.
receiveMessage:- not used in the above example, this seems critical to sending a value from R to js.
- argument “el” is the return value from
find. - argument “data” is the message from shiny::session$sendInputMessage(), that you will probably pass to
setValue.
The problems I encountered were:
- It wasn’t always clear to me the scope in which the above methods were called. For example, I had to realize that the object “el” is the result of find(), and the value for this at the top level in a method refers to the input binding itself (“incrementBinding” in the above example).
- My inputId was not visible to the server.
* Solution: either thefindorsubscribemethods were not locating the input in the DOM. - The value was NULL or incorrect.
* Solution: thegetValuemethod is not returning the correct value. - I couldn’t update my input value from the server.
* Solution: thesetValuemethod is either not receiving the message or not setting the value properly.
Ultimately I spent a few hours working through the debugging console in Firefox to identify the source of each problem above. If you aren’t familiar with debugging javascript, it is very similar to debugging R code (if you use debug(), debugonce(), or even sometimes browser() in R; I’ve not used trace() so I can’t compare it).
To use the console, just right click and select “inspect element”:

Or use the menu to select “web developer”, then choose “Debugger” (shortcut: Ctrl+Shift+S) from the top of the list:

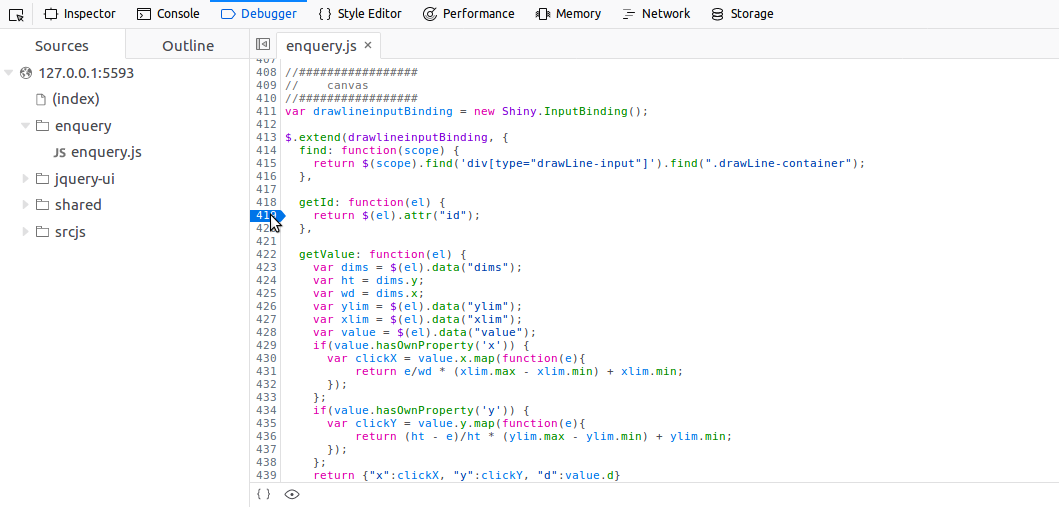
In the debugger, be sure you have the proper source selected, and then locate the function you need to step through. Place a breakpoint in the function by clicking a line number. Next time the function is called, it will stop at the breakpoint you selected and you can inspect the value for each variable within the function.
Other important aspects of debugging include adding debugger; to your javascript/jQuery, or sending yourself updates to the console via console.log(); (which is analogous to sending messages to the console in shiny using cat()).